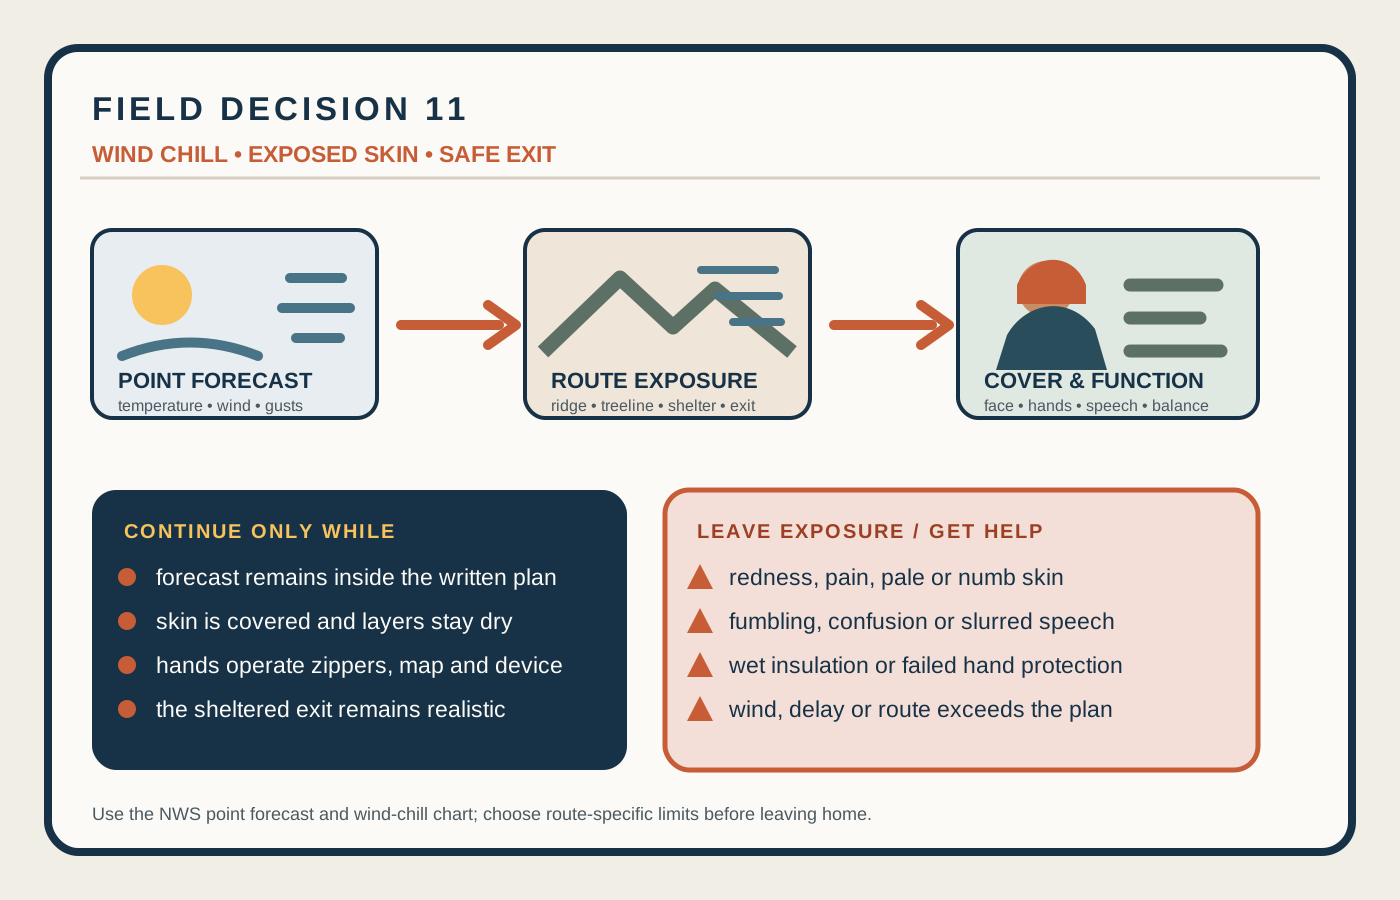
Wind chill is useful when it is treated as a decision input, not a complete promise about safety. The National Weather Service describes it as a measure of heat loss from exposed skin based on air temperature and wind speed. It is not the actual air temperature, and it does not describe every way a winter traveler can become cold.
That distinction answers a common winter-hiking question: “The forecast says 18°F but feels like 2°F—what number should I plan for?” Use the actual temperature for equipment and environmental questions such as freezing water, battery behavior, snow conditions, and material limits. Use the wind-chill value to understand how quickly exposed skin may cool. Then add wet clothing, exertion, duration, elevation, shade, route exposure, medical risk, food, fatigue, and the time needed to reach real shelter.
The topic is especially timely in early November, when National Weather Service offices across multiple states are running 2026 winter-weather awareness campaigns. It also fills a practical gap between this library’s wet-cold hypothermia guide and its winter daylight budget: a dry-looking day can still become an exposed-skin and hand-function problem when wind rises.
Redness or pain on exposed skin is an early reason to get out of the cold or cover the area. White or grayish-yellow skin, waxy or firm skin, or numbness may indicate frostbite. Confusion, fumbling, slurred speech, unusual exhaustion, memory problems, or drowsiness may indicate hypothermia. Leave exposure and seek medical help; use the group’s emergency communication plan when a safe self-exit is uncertain.
Read the NWS chart for what it actually estimates
The NWS wind-chill chart combines air temperature with wind speed and includes zones that estimate how quickly frostbite may develop on exposed skin. The underlying index models a human face under conservative conditions. That makes it valuable for cheeks, nose, ears, and other exposed areas. It does not guarantee that covered skin is safe for a fixed number of minutes, and it is not a countdown clock tailored to a particular person.
For example, the NWS explains that an air temperature of 5°F with a 30 mph wind produces a wind chill near −19°F, within its 30-minute frostbite zone for exposed skin. The practical lesson is not “everyone has 30 minutes.” The lesson is that bare skin, an exposed ridge, a delayed turnaround, and a glove failure can consume the group’s margin quickly. The chart’s time bands are warning zones, not permission to stay exposed until a deadline.
Wind chill also does not make an inanimate object colder than the actual air temperature. A water bottle, phone, buckle, or battery can cool toward the air temperature, while moving air may make that cooling happen faster. Check manufacturer operating limits and carry cold-sensitive items appropriately; do not substitute the wind-chill number for the actual temperature when evaluating equipment.
Use the point forecast for the route, not the nearest town
Mountain and open-country weather can differ sharply over a short horizontal distance. Open the NWS forecast for the trailhead, the highest or most exposed section, and the likely exit. Read the hourly temperature, sustained wind, gusts, precipitation, timing, and any watches, warnings, or advisories. Compare those conditions with land-manager alerts, avalanche information where relevant, road access, and recent trail reports.
- Mark the exposure window. Write the clock times when the group expects to be above treeline, on a ridge, crossing open ice-free terrain, or away from wind shelter.
- Record sustained wind and gusts. A calm trailhead does not disprove a windy ridge forecast. Gusts also affect balance, vision, communication, and the ability to handle gear.
- Calculate the return exposure. The route may face the wind on the way back. Do not plan only for the comfortable outbound direction.
- Identify a sheltered alternative. Choose a lower, shorter, or forested route that avoids the exposed objective without requiring a last-minute improvisation.
- Name the update time. Forecasts change. Recheck before leaving home and again at the trailhead when service is available.
Do not assume trees always provide safe shelter. Dead limbs, weakened trees, heavy snow, and high winds can create falling-tree hazards. A “sheltered route” should mean a verified route that reduces the relevant exposure without adding another known hazard.
Set four gates before the group starts
A single temperature cutoff is appealing because it is simple. It is also incomplete. Write a four-gate decision that can be checked at home, at the trailhead, before entering exposed terrain, and at planned checkpoints.
Forecast gate
Actual temperature, wind chill, gusts, precipitation, alerts, and visibility remain within the group’s written limit.
Coverage gate
Face, ears, hands, and feet can remain warm and dry with backup protection that is accessible before exposure.
Function gate
Everyone can speak clearly, answer simple questions, walk steadily, operate zippers, read the map, and use communication gear.
Exit gate
The group still has the time, daylight, route confidence, energy, and equipment needed to reach verified shelter.
If any gate fails, do not enter the next exposed segment. Turn toward the safest verified exit while the group can still move and operate equipment. An objective can wait for a better day; losing hand function, visibility, or route confidence makes every later task harder.
Choose conservative limits for the least cold-tolerant member and for anyone with health, medication, circulation, mobility, communication, or dexterity needs. CDC notes that poor circulation raises frostbite risk. A qualified healthcare professional can advise on individual medical concerns; a general wind-chill chart cannot.
Public hiking discussions repeatedly surface two mistakes: choosing layers only for the climb and asking for a universal “nope temperature.” Those discussions are useful for identifying questions, not for setting medical or operational thresholds. The answer must be route-specific: a short sheltered loop beside a warm building is not the same exposure as a remote ridge where a broken binding or slow partner adds hours.
Build a clothing system that survives one failure
NPS winter-hiking guidance recommends warm waterproof clothing and an extra dry set. CDC advises several loose layers, a hat, face covering, mittens or gloves, a water-resistant coat, and water-resistant boots. Translate that guidance into a system that can be changed with cold hands.
- Base layer: moves moisture away from the skin and is changed or supplemented before it becomes a cold reservoir.
- Active insulation: matches the group’s pace without forcing heavy sweating.
- Wind and precipitation shell: closes at the cuffs, neck, hood, and waist while preserving vision and hearing needed for the route.
- Stop layer: adds insulation immediately when pace slows, at breaks, or while helping a partner.
- Face system: covers cheeks, nose, ears, and chin without blocking breathing, fogging essential eyewear beyond safe use, or hiding skin checks.
- Hand system: includes a working primary pair and a dry backup. The wearer must still be able to deploy navigation, traction, and communication gear.
- Foot system: keeps insulation from being compressed by an overly tight boot and includes a plan for wet socks or boot failure.
Pack backup gloves, face protection, and the stop layer where they can be reached without emptying the pack into snow. Tether small critical items when appropriate. Test touchscreens, satellite communicators, headlamps, buckles, traction, poles, stove controls, and shelter components with the actual gloves—not bare hands in a warm room.
Manage sweat before it becomes a problem. Open safe vents, slow the pace, or remove an insulation layer before clothing soaks. Restore wind protection before entering an exposed section. Cotton is difficult to dry in cold conditions; select clothing based on the trip, expected moisture, and manufacturer guidance.
Run a two-minute skin-and-function check
Schedule checks before exposure, after a long climb, at every route decision, and whenever the wind or pace changes. Partners can see cheeks and noses that the wearer cannot. Ask specific questions instead of “Everybody good?”
- Skin: Is there new redness, pain, pallor, a waxy appearance, or numbness on the face, ears, fingers, or toes?
- Hands: Can each person open a zipper, operate a buckle, and use the emergency device without removing protection?
- Speech and thinking: Can the person answer location, route, and next-action questions clearly?
- Movement: Is gait controlled? Are there repeated stumbles, unusual slowing, or trouble with simple equipment?
- Clothing: Are inner layers, gloves, socks, and insulation dry enough to preserve the exit?
- Margin: Does the sheltered exit still fit the daylight and turnaround plan?
Record the check on a small card: time, location, wind trend, skin, hands, clothing, and decision. The goal is not paperwork. It is to notice a worsening pattern before numbness or confusion makes self-assessment unreliable.
Link this check to the trip plan and overdue handoff. A more conservative route or earlier return should be communicated when possible. If the group loses location confidence in blowing snow or changed terrain, use the STOP and last-known-location plan instead of walking faster into uncertainty.
Treat warning signs as an exit and medical decision
CDC says redness or pain may be the first sign of frostbite. Protect the area and get out of the cold. White or grayish-yellow color, firm or waxy skin, and numbness are more concerning signs. Because frozen tissue is numb, the affected person may not recognize the injury.
Seek medical care. Do not rub or massage frostbitten skin, use snow, or apply a heating pad, heat lamp, stove, fireplace, or radiator. Do not walk on frostbitten feet or toes unless absolutely necessary. CDC describes warm—not hot—water or body heat when immediate care is unavailable and there is no hypothermia, but wilderness rewarming decisions can be complicated by the risk of refreezing. Follow emergency-dispatch or qualified medical direction whenever possible.
Check for hypothermia first. Shivering, exhaustion, confusion, fumbling hands, memory loss, slurred speech, and drowsiness are CDC warning signs. Move the person to shelter, remove wet clothing when protected from further exposure, use dry insulation, and seek emergency medical attention. Handle the person gently and follow dispatcher instructions. Do not give alcohol as a warming measure.
If safe self-exit is doubtful, activate emergency communication early. Give the location, party size, condition, weather, shelter, equipment, and last known route. Make the group visible and use the signaling plan without sending an unprotected person away alone.
Practice: a 25-minute wind-gate rehearsal
Run this indoors and on a short local walk with an immediate warm exit. Do not create cold exposure to test the system.
- Open NWS point forecasts for the trailhead and the most exposed route segment.
- Write actual temperature, wind, gusts, wind chill, alerts, and the exposure window.
- Mark the primary route, sheltered alternative, turnaround, and warm exit.
- Lay out the active, shell, stop, face, hand, and foot systems plus backups.
- Put on gloves and operate every critical zipper, buckle, map, light, traction device, and communicator.
- Have partners inspect one another’s face coverage and identify gaps.
- Practice the skin, hand, speech, movement, clothing, and margin check.
- State the decision aloud: continue, switch route, turn around, or activate help.
Frequently asked questions
What does wind chill mean for a winter hike?
It estimates heat loss from exposed skin using air temperature and wind. Use it for exposed-skin frostbite risk, then separately assess actual temperature, wetness, duration, terrain, clothing, health, equipment, group function, and the route to shelter.
At what wind chill should hikers turn around?
There is no universal cutoff that fits every route and group. Set a conservative limit before departure using the current point forecast, NWS chart, worst exposed section, reliable skin coverage, group needs, hand function, and a realistic exit margin.
Can frostbite happen under clothing?
Clothing reduces exposure only when it provides suitable insulation and wind protection and stays dry enough to work. Tight, wet, displaced, or failed clothing can leave an area vulnerable. Keep checking sensation, color, coverage, and function.
Should I rub numb fingers or cheeks?
No. CDC warns against rubbing or massaging suspected frostbite and against direct high heat. Leave the cold, protect the area, check for hypothermia, and seek medical care.
Sources checked
Reviewed November 9, 2026.
- National Weather Service — Wind Chill and Frostbite Time Chart
- National Weather Service — Wind Chill Temperature Index
- National Weather Service — Awareness and Preparedness Calendar
- CDC — Preventing Frostbite
- CDC Yellow Book — Heat and Cold Illness in Travelers
- National Park Service — Winter Hiking Tips
- National Park Service — Be Winter Ready for Your Adventure