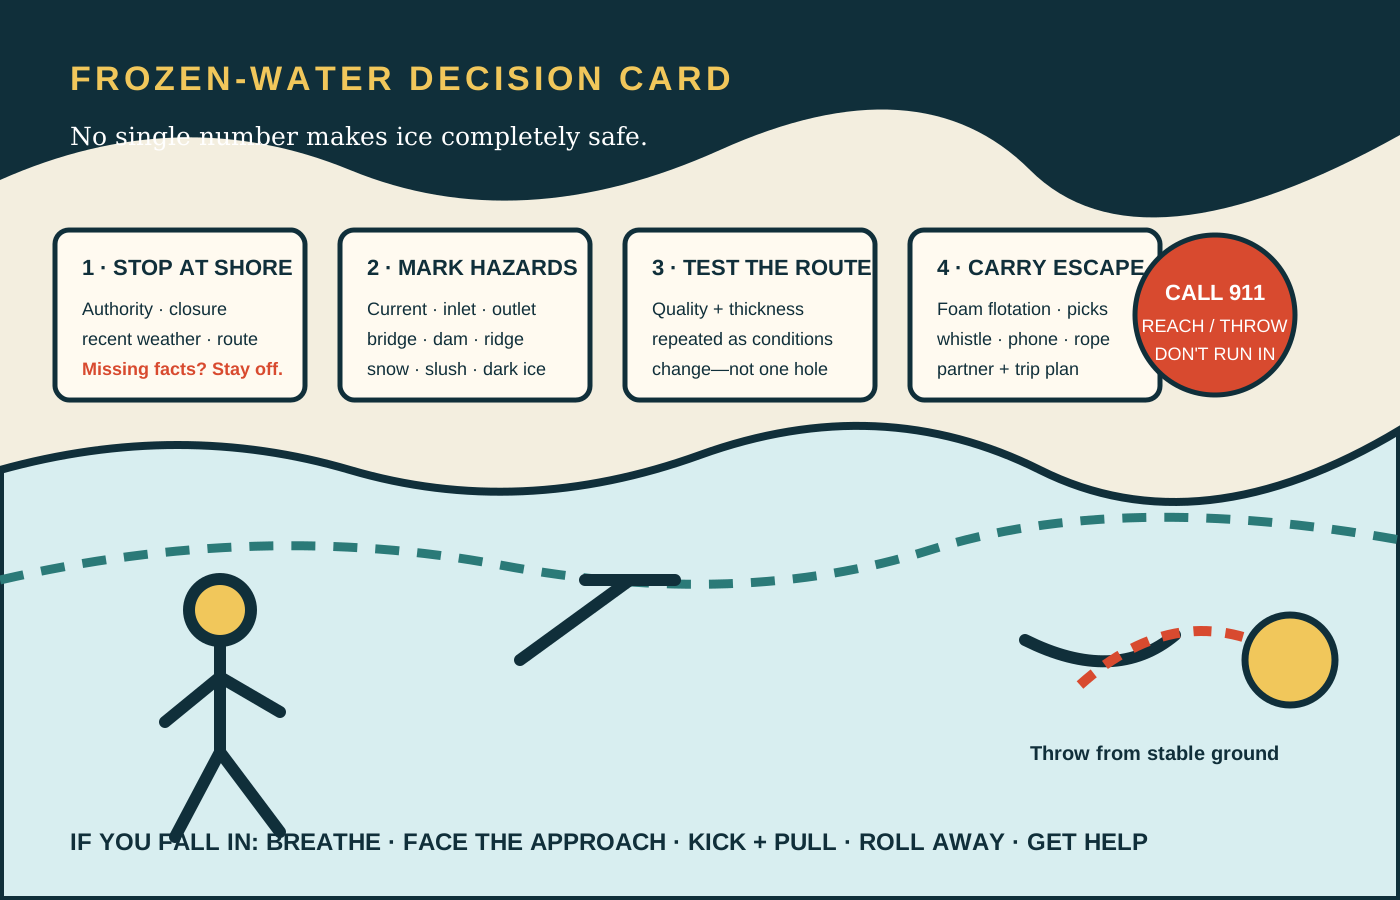
Frozen water can look continuous from shore while changing from strong ice to a thin skin within a few steps. Snow hides texture. Current moves below the surface. A warm spell, rain, spring, dock bubbler, pressure ridge, or constriction can weaken one part of a lake without making the change obvious from a distance.
The National Weather Service and state natural-resource agencies repeat the same first principle: there is no such thing as 100 percent safe ice. That statement is not a disclaimer attached to a thickness chart. It is the organizing fact. A useful plan combines current local knowledge, repeated direct observations, conservative route choices, flotation and self-rescue equipment, a partner, and a hard decision to stay off when information is missing.
Do not use this guide to declare ice safe. Obey closures and signs, check the authority responsible for the water, and use the most conservative current local guidance. Children and pets should be kept away from unmanaged frozen water.
Make five checks before leaving shore
Pause at a place where turning around is still easy. Complete every check; one reassuring answer cannot cancel a serious warning elsewhere.
- Authority. Identify the park, reservoir operator, state agency, municipality, outfitter, club, or other responsible local source. Confirm closures, posted routes, known hazards, and whether anyone actually monitors conditions.
- Recent change. Review temperature swings, rain, snow, wind, water-level changes, current, dam or aerator operation, and reports from the current day. A date on last winter's photo or a familiar calendar week is not evidence for today.
- Route. Map the exact path and mark inlets, outlets, narrows, bridges, docks, culverts, springs, dams, pressure ridges, vegetation, dark areas, and open water. If the route depends on crossing one of these zones, choose another plan.
- Measurement. Determine who has the training and equipment to test ice without entering an unknown hazard. A single shore hole or someone else's track does not describe the entire route.
- Escape. Wear appropriate flotation, keep ice picks and communication reachable, travel with a partner, and tell a trusted person the route and return time. If the rescue plan begins after a break-through, the plan is late.
“People are already out there” is not a check. Tracks can cross a route before warming, miss a spring, or belong to someone who accepted a risk you do not understand. A vehicle, shelter, or crowd on one area also says nothing about the untested path from shore.
Treat thickness as a minimum guideline, not a permission slip
National Weather Service guidance commonly identifies four inches of new, clear ice as a minimum guideline for one person walking or ice fishing. Minnesota DNR uses the same threshold for solid, clear ice on foot. Those figures describe a specific ice type and activity. They do not convert old, layered, refrozen, slushy, snow-covered, river, or deteriorating ice into the equivalent of new clear ice.
White or snow ice contains more air and is weaker. The NWS advises doubling thickness guidelines for white ice. Minnesota DNR warns that thickness can change from a foot to only an inch or two within a short distance. Wisconsin DNR says strength cannot be judged from one factor such as appearance, age, thickness, temperature, or snow cover. The water body, chemistry, depth, current, load, and weather all matter.
New clear ice
The reference condition used by many public minimum-thickness charts. It still requires local checks and repeated measurement.
White or snow ice
Weaker, air-filled ice. Do not count it as equal to the same thickness of new clear ice.
Refrozen or layered ice
Freeze-thaw cycles, cracks, slush, and layers can make the structure hard to interpret. A total measurement can hide poor quality.
River or current ice
Flow can erode the underside and create sharp variation. Avoid currents and rely on specific local management, not a lake chart.
This guide intentionally does not reproduce vehicle-load charts. Driving on ice adds weight, escape, spacing, route, and operator problems that need water-body-specific management. Minnesota DNR advises that enclosed vehicles add risk and recommends plowed ice roads where available. A road operator's current rules and closures control; a general web chart does not.
Name the weak zones before snow hides them
Moving water is a recurring warning in official guidance. Avoid inlets, outlets, streams, narrows, culverts, bridges, channels, and areas near dams. Springs and groundwater can deliver relatively warmer water from below. Aerators and bubblers deliberately keep water moving and can produce open or thinned areas beyond the visible opening.
Pressure ridges, heaves, cracks, and seams show that the sheet is moving. Open water, water over the ice, a dark patch, gray ice, slush, a wet shoreline, or a thawed-and-refrozen appearance are reasons to stay off. Snow can insulate the sheet and slow ice growth while concealing holes and cracks. A new snowmobile track is not a test of the route beneath it.
Shore ice deserves its own decision. Water levels can drop and leave ice unsupported. Sun-warmed rocks, retaining walls, docks, and vegetation can weaken the edge. On large lakes, shelf ice built by waves is especially deceptive. Sleeping Bear Dunes National Lakeshore describes shelf ice as unstable, cracked, hollow, and unsafe to step on; it can collapse like a trapdoor above cold water.
Conditions also change during the outing. Sun, rising temperature, wind, rain, water release, current, and repeated traffic can alter the same path used earlier. The return route must be checked again rather than assumed from the outbound crossing.
Measure the route, not a convenient spot
Only test when local guidance supports going out and the tester already has appropriate training, flotation, reachable ice picks, a partner, and a way to call for help. Minnesota DNR recommends a chisel or drill and a tape measure, with frequent checks because thickness varies. Early and late in the season, a chisel can help test as a person advances.
- Begin from a known, managed access. Do not step onto unknown ice merely to obtain the first measurement.
- Identify ice quality. Record clear ice, white ice, layers, slush, cracks, water, and recent weather rather than writing only one total number.
- Measure directly. Use a suitable chisel, auger, or drill and hook the bottom of the sheet with a tape measure according to agency instructions.
- Repeat along the exact route. Check frequently and more often near any change in color, texture, snow cover, depth, shoreline, structure, or current.
- Stop on the first uncertainty. A surprising reading, crack, water, current sign, equipment problem, or missing route knowledge ends the attempt. Return along the tested approach.
Do not send the lightest person ahead as a probe. Do not spread the group out merely to create a line of testers on unknown ice. Keep enough distance to avoid concentrating the load while maintaining the buddy and communication plan required by local guidance.
Build the self-rescue system before the crossing
Minnesota DNR calls a foam life jacket or flotation suit a primary survival item and recommends ice picks worn where they can be reached immediately. It cautions that inflatable life jackets may not inflate properly at low temperatures. Wisconsin DNR also recommends ice claws or picks, a phone in a waterproof case, a life jacket, and a length of rope.
- Foam flotation: Wear it for on-foot activity when agency guidance supports travel. Follow the separate rules for enclosed vehicles; Minnesota DNR warns not to wear bulky flotation inside a vehicle because it can impede escape.
- Ice picks: Wear them high and accessible, not buried in a pack. Practice their grip and protective covers on dry land.
- Whistle: Keep it reachable. Calling repeatedly can waste energy, and cold shock can make speech difficult.
- Throw rope or bag: Carry enough line for the route and know how to deploy it from stable ground without tangling.
- Waterproof communication: Protect the phone and consider an appropriate locator when coverage is absent. File a route and return time with someone ashore.
- Warm, dry recovery kit: Keep dry layers, shelter, and warming supplies where a wet person can reach them quickly after leaving the water.
Cold-water immersion can trigger an involuntary gasp and rapid breathing. NWS explains that cold shock can disrupt breathing, heart rate, and blood pressure, while loss of muscle control can follow quickly. Flotation buys time to control breathing and act. It does not make weak ice acceptable.
If you fall through: control breathing, return the way you came
Official state guidance shares a consistent sequence. Try to remain calm and control the cold-shock breathing response. Turn toward the direction you approached; that is the ice that supported you immediately before the break. Keep winter clothing on because trapped air can add some flotation and insulation.
- Call out and face the approach. Use the whistle if available. Keep the head above water and control breathing before spending strength.
- Get horizontal. Place forearms on the unbroken surface and kick the legs to bring the body level with the ice.
- Use the picks. Drive each point into the surface and pull while kicking, sliding the chest forward rather than trying to stand.
- Stay low after exiting. Roll or crawl away along the approach route so weight remains distributed. Do not stand beside the hole.
- Get emergency help. Move to shelter, remove wet clothing when protected, use dry insulation, and seek medical assessment after cold-water immersion. Do not use alcohol as a warming measure.
This is a memory sequence, not a substitute for supervised training. Practice the arm, kick, pull, and roll motions on dry ground with protected training picks. Do not create a real immersion or weak-ice scenario to rehearse it.
For a bystander: call, reassure, reach or throw—do not run to the hole
Minnesota DNR says to call 911 first. Resist the urge to approach the break; the same weak area can create a second victim. From shore or another stable position, keep talking to the person and tell them help is coming. Direct them toward the approach edge and a horizontal kick.
Extend or throw from safety. A rope, throw bag, flotation device, ladder, branch, jumper cables, or another long object may allow contact without putting the rescuer at the edge. Brace from a stable location. If the pull starts dragging the rescuer toward the break, let go and reset rather than joining the victim in the water.
Professional ice rescue requires training, protective equipment, tethered systems, and coordinated backup. Untrained people should not improvise a direct-contact rescue on weak ice. Keep emergency dispatch informed about the exact access, number of people, visible landmarks, and any vehicle or animal involved.
Do not chase an animal onto weak ice. Call 911 or the local emergency authority and follow their instructions. A person entering an unverified area can turn an animal incident into a human rescue.
After the exit, the emergency is not over
Cold water and wet clothing continue to remove heat. Move the person gently to shelter, protect them from wind and ground contact, and replace wet layers with dry insulation when it can be done safely. Follow emergency dispatcher instructions. Severe shivering, confusion, clumsiness, slurred speech, unusual behavior, slowed breathing, or loss of consciousness need urgent care.
The site's cold-rain hypothermia guide explains early behavior and movement changes, but an ice immersion is an emergency with drowning, cold shock, injury, and cardiac risks. Do not assume someone is fine because they climbed out or can speak.
Practice: a 20-minute frozen-water decision drill
Do this indoors or on dry land. Never practice by stepping onto unverified ice or entering cold water.
- Choose a real nearby lake, pond, river, reservoir, or shoreline.
- Identify the managing authority, current closure page, emergency access, and who—if anyone—reports conditions.
- Mark inlets, outlets, narrows, bridges, dams, aerators, docks, springs, pressure ridges, and shelf-ice exposure on a map.
- Read the last seven days of temperature, rain, snow, and wind, then name the observations still missing.
- Lay out foam flotation, ice picks, whistle, waterproof phone, throw rope, dry layers, and a trip plan.
- From a stable floor, rehearse: control breathing, face the approach, arms up, kick, pull, roll away.
- With a partner, deploy a throw rope to a target while both people remain on dry ground.
- Finish by writing the no-go sentence: “If current local conditions or repeated measurements are missing, we stay ashore.”
Frequently asked questions
How thick must ice be before a person can walk on it?
No number makes ice completely safe. Public guidance commonly uses four inches of new, clear ice as a minimum for one person on foot, after local checks and repeated measurement. White, layered, deteriorating, current-affected, or unverified ice cannot be treated as equivalent.
Is river ice safe to walk on?
Current can thin ice from below and produce sharp variation. NWS and state guidance identify rivers, streams, inlets, outlets, bridges, and dams as dangerous zones. Avoid them unless a responsible local authority specifically manages and opens a route.
What if the ice was safe yesterday?
Recheck. Rain, sun, wind, snow, freeze-thaw cycles, water-level changes, current, and traffic can change the sheet. Yesterday's measurement applies only to that place, time, route, ice quality, and loading.
Should I follow another person's tracks?
No. Tracks do not show when the person crossed, what they measured, whether the ice changed, or whether the route ahead is sound. Make your own authority, condition, route, measurement, and rescue checks.
Sources checked
Reviewed October 29, 2026. Current local closures, responsible-authority instructions, and emergency services take priority.
- National Weather Service — Ice Storms, Black Ice, Frost & Ice Safety
- National Weather Service — Cold Water Hazards and Safety
- National Weather Service Riverton — Outdoor and Ice Safety
- Minnesota Department of Natural Resources — Ice Safety
- Minnesota DNR — Ice Safety Gear
- Minnesota DNR — What If Someone Else Falls In?
- Wisconsin Department of Natural Resources — Ice Safety
- National Park Service, Sleeping Bear Dunes — Shelf Ice Safety