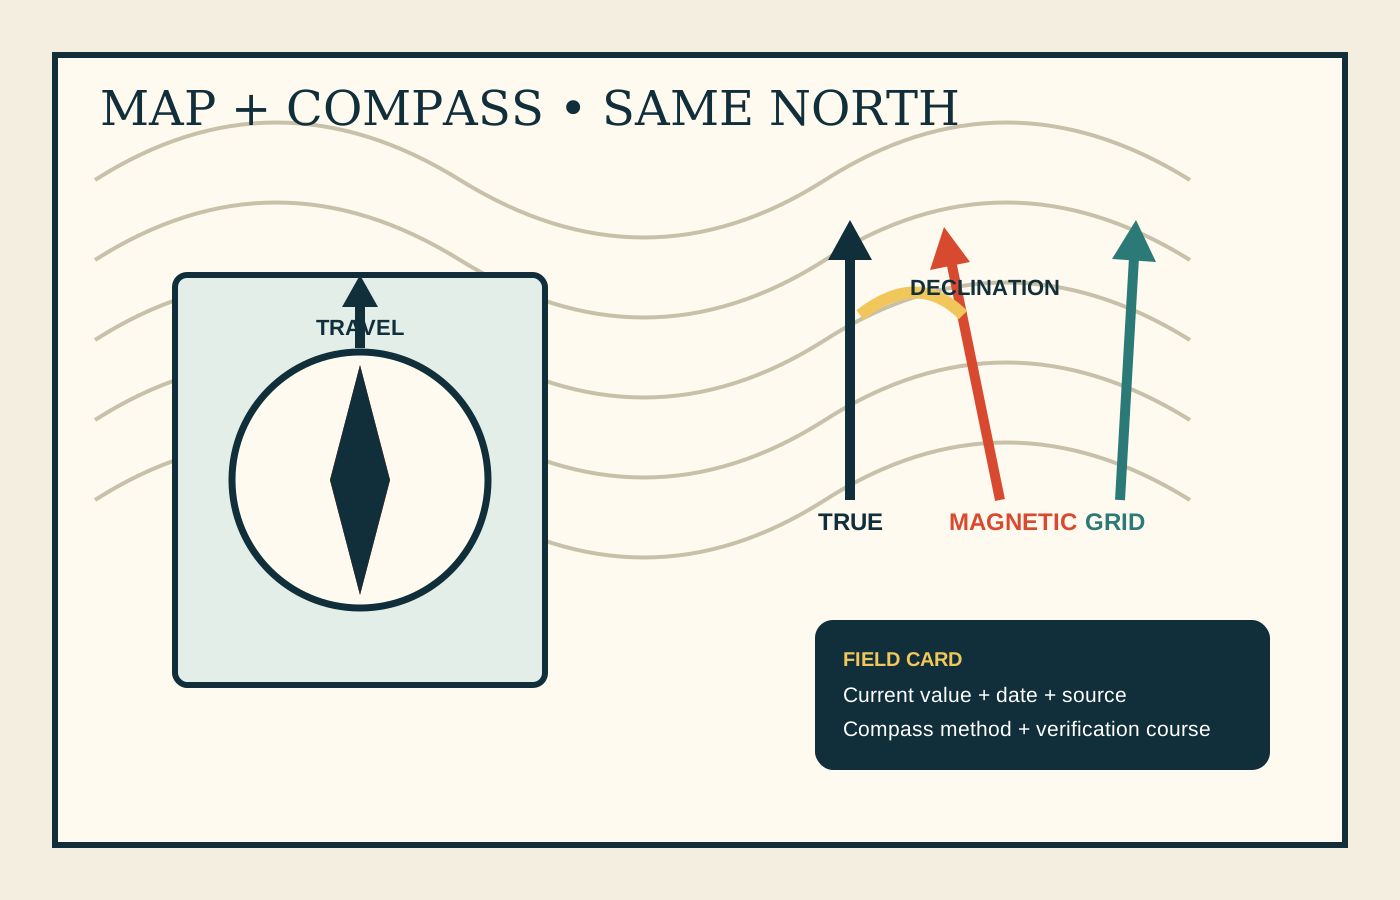
A compass can be working perfectly and still send you away from the line drawn on your map. The needle and the map may be referencing different norths. Before using a bearing, identify which north the map uses, which north the compass reads and how the local magnetic declination connects them.
This is a high-value skill because the error accumulates with distance. A small angular mistake may seem harmless across a parking lot and become a missed trail junction, drainage or handrail after a long leg. Public navigation discussions often reveal the same breakdown: someone memorized “east is least” or “add west” without labeling the direction of conversion, then applied the rule backward or used a compass whose declination had already been set.
Learn on a mapped park, school field or other permitted open area with obvious boundaries and a partner. Do not use a first declination exercise to travel off trail, cross hazardous terrain or continue after location confidence is lost. If you become lost, use the STOP and last-known-location plan.
Read all three north references
USGS explains that the collar of many topographic maps shows three arrows. True north, sometimes marked with a star, follows the longitude line toward the geographic North Pole. Magnetic north shows where a compass needle pointed at the location and date associated with the map. Grid north follows the map's rectangular coordinate grid, commonly the Universal Transverse Mercator grid on current US Topo maps.
These directions can differ. Magnetic declination is the direction and angle between true north and magnetic north. Grid convergence is the angle between grid north and true north created by projecting the curved Earth onto a flat grid. On a short recreational exercise the true-grid difference may be small, but it should not be silently mixed into precise work. Decide whether your planned bearings reference the map's true-north framework or its grid.
True north
The geographic reference used by longitude. Often shown by a star in a USGS north-arrow diagram.
Magnetic north
The direction the compass needle aligns locally. It varies with location and changes over time.
Grid north
The north direction of the map's printed coordinate grid. It can differ from true north.
Declination
The signed angle connecting true and magnetic north at a place and date.
Start by circling the north diagram and reading its date. Do not assume the top of every map, the vertical UTM grid lines and the needle are identical. Write a plain-language note on the trip copy: “Map bearings referenced to true north” or “Map bearings referenced to UTM grid north.”
Find a current declination for the trip location
Magnetic north moves, so the declination printed on an old map can be outdated. USGS specifically warns that magnetic declination varies with location and time. NOAA's magnetic declination calculator uses current geomagnetic models and accepts latitude, longitude and date. Get the value for the center of the travel area or another representative point, not your home hundreds of miles away.
- Choose the location. Use coordinates for the practice or travel area and confirm the hemisphere and longitude sign.
- Choose the date. Record the date with the result so the field card is auditable later.
- Record magnitude and direction. Write both the number and east or west direction; do not keep an unlabeled number.
- Record the source. Note NOAA, the model shown by the calculator and the access date.
- Compare with the map collar. A different older value may be normal, but a large or opposite difference is a cue to check coordinates and signs.
NOAA says environmental factors can disturb local magnetic readings even when the model estimate is sound. The calculator provides an estimated regional value, while the compass can be influenced by nearby metal, magnetic closures, power lines, vehicles and electronics. The field procedure still needs a clean reading and a reasonableness check.
Build one trip card
Write the map title and edition, map north reference, current declination, date and source, compass model, adjustment method and a known verification line. Keep the card with the map. If the group carries several compasses, verify each one; some may be adjustable while others require a conversion at every bearing.
Set an adjustable-declination compass
An adjustable compass lets you offset its orienting arrow so bearings can be read in the map's chosen north reference while the needle still follows magnetic north. The exact direction, scale and tool differ by model. Use the manufacturer's instructions for that compass rather than forcing a generic adjustment.
Before changing anything, inspect the compass for a declination scale, adjustment screw or tool, and confirm whether a previous value is already set. A hidden old adjustment can duplicate the correction. Photograph or note the starting position, then set the current local value exactly as the manual describes. Label the compass or field card with the value, direction, date and area.
Test the setting on a known line before trusting it. Choose two clearly identifiable points visible on the ground and map—a straight trail segment, field edge or distant landmark from a fixed location. Take a map bearing, follow the compass procedure and confirm the direction. If the result is obviously wrong, stop. Check the map reference, travel-arrow direction, 180-degree reversal, east/west sign and whether the correction was applied twice.
Do not hide the method
Write “adjustable compass set to ___° east/west for ___ location on ___ date.” Another group member should be able to inspect the setting and repeat the known-line check. A bare bearing number without its north reference is incomplete.
For a nonadjustable compass
A nonadjustable baseplate compass can still work, but every conversion must be handled deliberately. USGS publishes step-by-step methods for converting a map bearing to the magnetic bearing used with an unadjusted compass. Follow one complete authoritative method from start to finish. Do not mix a diagram from one method with a mnemonic from another.
The safest learning habit is to label each number before doing arithmetic: “true bearing,” “magnetic declination” and “magnetic bearing.” Sketch the true- and magnetic-north arrows for the actual location. Then use the USGS instructions and verify the result against a known landmark. If you cannot explain which north each number references, the conversion is not ready for field use.
Take a bearing from a known point to a known destination
This exercise assumes both points are identified on the same current map. It does not solve the separate problem of locating yourself. If the starting position is uncertain, taking a precise bearing from the wrong point only creates a precise error.
- Mark start and destination. Confirm each feature on the ground and map. Draw or imagine a straight line between them.
- Place the compass. Lay a baseplate edge along the line, with the direction-of-travel arrow pointing from start to destination. Reversing it produces a bearing 180 degrees wrong.
- Align the housing to map north. Rotate the dial without moving the baseplate until the orienting lines are parallel to the chosen north lines and the orienting arrow points north, not south.
- Read and label the map bearing. Note whether declination is already built into the compass setting or still must be converted.
- Move away from interference. Step away from the car, fence, phone, steel table, magnetic watchband, tools and power infrastructure.
- Hold the compass level. With the travel arrow pointing forward, turn your body until the magnetic needle aligns with the adjusted orienting arrow or the method's required mark.
- Sight a reachable landmark. Choose a tree, rock or building on the line, walk to it on safe terrain, then repeat. Do not stare at the dial while walking.
A bearing is a direction, not a route guarantee. Terrain, private land, cliffs, water, vegetation, avalanche exposure and closures can make the straight line unsafe or illegal. Use the map to choose safe travel corridors and handrails. Navigation supports route decisions; it does not override them.
Catch the five common errors
1. The travel arrow points backward
A straight line has two bearings 180 degrees apart. Before rotating the dial, say aloud: “start here, destination there” and check that the direction-of-travel arrow points to the destination. A reciprocal bearing can be useful for returning, but it must be intentional.
2. The orienting arrow points south
Parallel lines are not enough. The orienting arrow must point toward map north. Aligning it south creates another 180-degree reversal, sometimes called putting red in the shed backward.
3. Declination is applied twice
If an adjustable compass is already set for local declination, do not also add a manual correction unless its instructions specifically call for one. The field card should state the setting so every group member uses the same workflow.
4. The value came from the wrong place or year
A declination copied at home, from a forum or from a decades-old map collar may not fit the trip. Use coordinates and a current authoritative model. Retain the map collar because it explains its own reference system, even when its magnetic value needs updating.
5. Metal changes the needle
USGS warns that iron and steel objects can affect compass readings. Take one reading, move several steps away and take another. Compare readings with and without the phone, watch, knife or trekking pole nearby. If they do not agree, find the source of interference before navigating.
Integrate the compass with GPS without mixing north settings
A phone or GPS receiver may display bearings referenced to true north, magnetic north or grid north. Check the device setting. If the map workflow uses true north and the device reports magnetic bearings, identical numbers will not describe identical directions.
Record coordinates in a format everyone understands, download maps for offline use and carry spare power. Electronics can provide position and a useful cross-check, but batteries, damage, canopy, terrain and user settings can fail. NPS includes map, compass and GPS in navigation planning and emphasizes knowing how to use them before the trip.
Use independent agreement as a strength: terrain shape, map, known landmarks, compass and GPS should tell a coherent story. When one disagrees, stop and diagnose. Do not simply choose the instrument that points toward the hoped-for destination.
Practice: a 25-minute declination course
Choose a permitted open area with mapped boundaries, good visibility and no need to enter traffic, water, steep ground or private land.
- Print the current map and mark two visible landmarks plus a start point.
- Use NOAA to record current declination, direction, date and coordinates.
- Set the adjustable compass according to its manual, or write the USGS conversion method for a nonadjustable model.
- Take a bearing from start to landmark A and predict the visible line before lifting the compass.
- Move away from metal, align the needle and compare the travel arrow with the actual landmark.
- Repeat for landmark B, then take the reciprocal bearing back toward start.
- Have a partner introduce one error—backward baseplate, wrong north, nearby metal or double correction—and explain how the check catches it.
Carry a five-line field card
- Map north: true or grid, with map title and edition.
- Declination: magnitude, east/west direction, location, date and authoritative source.
- Compass: model and whether the adjustment is already set.
- Verification: known line or landmark used to confirm the setup.
- Stop condition: location uncertainty, instrument disagreement, unsafe terrain or lost group contact means stop and reassess.
Review the card whenever the trip area, map, compass or date changes. A setting suitable for one region can be wrong for the next. The aim is not fast mental arithmetic under pressure; it is a documented system that the group practiced while calm.
Sources checked
Reviewed October 15, 2026.
- U.S. Geological Survey — How to Use a Compass with a USGS Topographic Map
- U.S. Geological Survey — What the Different North Arrows Mean
- U.S. Geological Survey — Magnetic Declination Varies Across the United States
- NOAA National Centers for Environmental Information — Magnetic Declination Calculator
- National Park Service — Get the Right Angle
- National Park Service — Ten Essentials